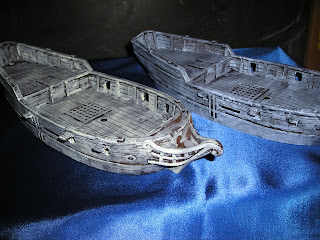
A few years ago (!?!) I obtained a pair of sloops and a force of pirates for the Blood & Plunder system.
Painting the Pirates was not so much a challenge, and you can see them all here, having finished them in February this year.
I had not built, nor painted a ship model since my teens, and was initially intimidated by the prospect of rigging. So I took my time and the extra precaution of obtaining extra cord, with which to re-do any rigging I messed up.
I also too the time to research many different approaches that more skilled model makers and sail makers have done, I have whole sections of my image files set aside with loads of pictures of other people's models and some real world sloops, brigs, 6th rates and a few flyte's and some galleons.
The best supporting blog I found was this by the 1000 foot general, many thanks to the author for his great documentation of his works.
So I began ...
 |
| first, a detail cleaning of all hulls including opening the gunports and cleaning them of excess 'flash' |
 |
| these boats do not float, seen here the first hull going down in a sink of lightly soapy water |
 |
| a gentle brushing was done to remove all remaining dust from the cleaning and any mold release agent(s) that might not react well with spray primer |
 |
| the details were carefully checked to ensure that no trapped air bubbles would cause flaws in the primer layer |
 |
| then the second hull went under water |
 |
| all were left to dry for a day or two |
 |
| then a grey spray basecoat layer was done (note the white object like a hull with metal fender washers ... it will feature in a future posting) |
With the hulls thus prepared a process of painting was thus entered into, which would last a few weeks, this was done while other tabletop games were going on over the summer months of July and August.
 |
| each sloop was being done as a 'set' of matched hull, rowboat and light cannon |
 |
| here they are seen in their 'dark chocolate' layer which comes after the basecoat |
 |
| next came a lighter 'wet' or 'damp' (almost drybrush) layer |
 |
| one sloop was to be a darker color than the other it is at this stage that the 'differentiation' comes about, by having one light layer in 'gray' the other in light 'tan' |
after allowing the light color layer to dry fully, came the color setting process
 |
| this sloop was to become the 'darker' color scheme |
 |
| the 'lighter' color scheme |
dry brushing then happened, as I wanted more of a mixed wood look
 |
| the two sloop hulls now showing more contrast |
 |
| likewise for the rowboats |
 |
| inking layers then go on (the sloops pictures were all blurry) |
 |
| then came a series of color layers |
 |
| each layer being done slightly brighter, so as to keep the amazing wood grain of these fantastic sculpts |
the inks were also used on the wooden parts ...
 |
| each model comes with all the rigging parts for this one I have used brown, black and red ink to give the parts and masts a darker tone |
 |
| same image as above, no flash used in photography |
The hulls and rowboats and cannon all started to really come together, I was starting to get excited about the potential for games and images. I haven't played much pirate stuff since 2004.
 |
| the 'dark' sloop, going to be a 'pirate' sloop |
 |
| while the 'light' green sloop will take on privateer roles more |
Now all the hulls were done and it was time to seal in things with a matte spray.
 |
| here they are still 'wet' from the fresh matte spray |
 |
| the rigging parts, in the yellow wooden color, can be seen between the gun ports |
All looking good now, time to face the challenge of rigging ...
 |
| one last set of photos |
 |
| just to prove they looked good up to this stage |
Alright, really now, rigging ...
Okay
I admit it, I did more reading and more study of things on the 1000 foot general site and others.
It was a slow process for the first sloop and I was determined to 'cut' as little as possible and also decided to *not* go for the ratlines, because I am doing craft foam sails.
 |
| there it is, the first finished sloop |
 |
| the other sloop also now in finish condition |
 |
| each rowboat got a similar colorful treatment |
The next day was sunny in August ... time to get out the camera!
The 'sea' is a clear plastic sheet over a differentiated blue cloth that reflects light differently depending on the angle of the light and observer, with the threads going from a lighter to a darker blue.
The combination of the light and reflections of the sun made for a downright tropical feel to the images.
The games are going to be epic!
We can use the B&P system, or Pulp Alley, or Peter Pig, or any sort of homebrew we want and these miniatures look awesome!
I have already added to the collection with some European sailors, gun crews and a Brigantine ... the next painting challenge.
The future I see is at least a Tartana (or two) and likely a 6th Rate Frigate ... just so that the 'big ships' action can be brought to life. How soon they get added to the collection, let alone painting queue, is as yet unknown.
Feel free to comment on the pirate fleet so far and what additions/changes you think/feel would look good?


3 comments:
Wonderful looking sloops! Thanks for the step by steps, I'm going to have a go at converting something to a pirate ship and this will help a lot!
Best Iain
Now that is a labour of love! Well worth the effort.
The boats look fantastic. I really like the trim colour choices; they really look good with the hull colours. Your sea look great too.
Post a Comment