As part of the
Campaign of Nations game the Battle of Marienberg was played out, on the fictional date of 21 August 1813 on the table 15 June 2013.
 |
| Prussian Combined arms of von Kleist took to the table for the first time |
The forces were of
French IV and XI Corps under the Command of
Maréchal Macdonald, Duke of Tarente along with Elements of
III Cavalry Corps.
Opposing them were the Prussians:
Left Wing: Generallieutenant von Kleist, Austrians of
3rd Army Abtielung: Feldzeugmeister Graf I. Gyulai and Russians of
2nd Corps: Generallieutenant Prince Wurttemberg, Cavalry Corps: Generallieutenant Count Pahlen III under the command of:
Commander-in-Chief: General of Infantry Barclay de Tolly.
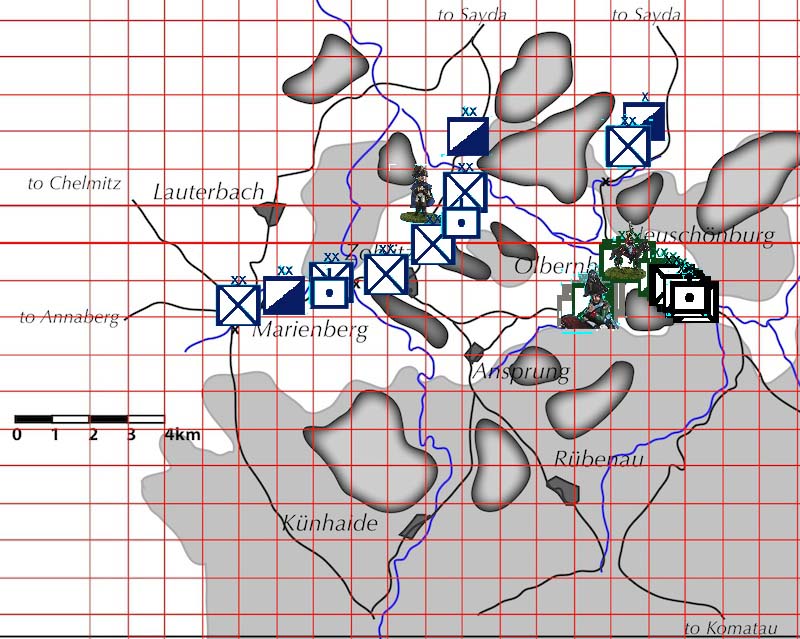
The field of battle was the lower ground between Olbernhau and Zoblitz and the river line between Olbernhau and the Zoblitz-Sayda bridge.
 |
| regional picture of troop positions |
 |
| close-up of the region map - showing tabletop area |
 |
| Table start positions, Olbernhau in bottom right, Zoblitz top left, Ansprung center left |
|
|
The Austrians were 'on the table' along with French XI Corps and leading elements of IV Corps at Zoblitz.
The first turn per the d6 roll of "2" was 10h00 (mid morning turn 2)
 |
| French deployment line looking towards Zoblitz |
 |
| Maréchal Macdonald, Duke of Tarente |
The Allies won initiative for the first pulse (there are up to 4 'pulses' per turn in
Fast Play Grand Armee)
This permitted the Austrian column to rush up towards Ansprung and have the Prussian column under von Kelist begin to flow onto the table - led by Prussian cavalry and followed by artillery and infantry this column's job was to smash into XI Corps and open the bridge north out of the Bohemian mountains.
 |
| Austrians move forward past Ansprung |
 |
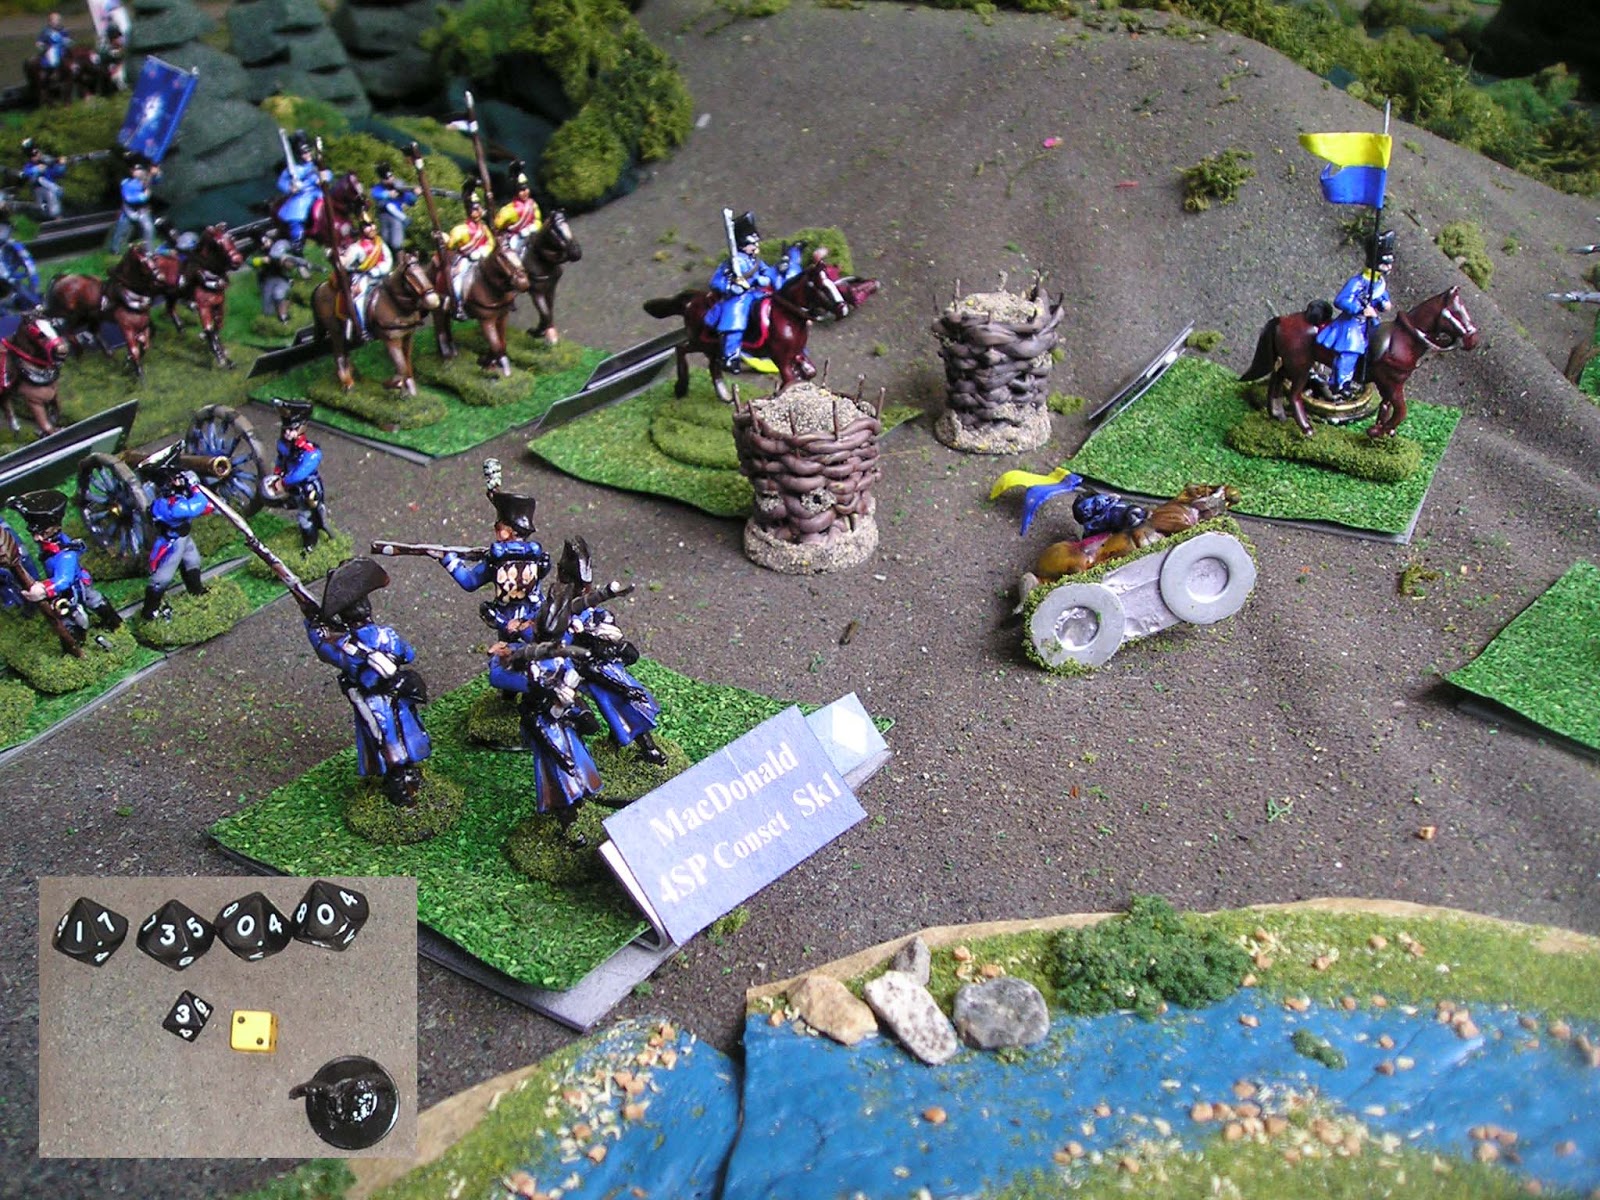
| French had set up a defended gun line |
 |
| Russian General Barclay de Tolly was having to command Austrians and Prussians |
 |
| Prussian horse lead von Kleist columns out of Olernhau, de Tolly is to the right in this image |
The French side pushed forward the Württemberg force and Italians arrived on their flank along with some light cavalry to pressure the Austrian column.
 |
| half way through the first pulse of the game using Fast Play Grand Armee |
 |
| at Zoblitz the Württemberg force is lined up while Italians form a column of brigades to their left |
 |
| cross-view of Zoblitz showing the Italians in column |
Turn 2 (the first turn - I know it is confusing and FPGA has a 'variable' start time) only had the one 'pulse' so it was on to turn 3 (near noon), again the Allies won the initiative, though this turn was to have a major impediment ... MacDonald had rolled '4' for his command dice (how much influence he could have on the actions of his division commanders) and de Tolly had rolled a '2'!
 |
| overall situation change at the start-point of pulse one turn 3 |
Prussian cavalry continued to lead the way at the head of the Prussian columns
 |
| first time on the table for these freshly painted Prussian Horse |
 |
| same Prussian horse, now the French gun line could be seen ... |
The Dragoon Division of Defrance had arrived in the latter half of turn 2 pulse 1 and now could be seen behind the infantry on the road crossing the vital bridge to Sayda.
 |
| French 4th Heavy Dragoon Division under Defrance with Arrighi overseeing |
 |
| Allied move completed now mid-way through the turn |
High Noon was the time when the Prussian Cavalry reached the French gun line.
The guns had fired, sadly to no effect, for the two brigades of Uhlans and Landwher horse that reached the line were able to smash all the artillery of XI Corps reserve and Ledru's 31st Division, while only suffering a single casualty.
The main point of the French defensive line for XI Corps was now destroyed ... how could they hope to hold on?
 |
| Prussian Horse breach the line of French artillery |
Meanwhile, on the other side of the central hill, Creneville's 1st Division of the 3rd Army Corps was in a bloodbath with the Württemberg force and French light cavalry.
 |
| Austrian divisions clash with Württemberg foot and French horse |
Both sides dealt out blows, with the Württemberg force and French horse coming out the worst for the encounter.
 |
| Bertrand was having to decide what to do ... |
The trouble was that the Italians had suffered a loss of morale and their command dice came up a "3" meaning that they had to retreat until outside 20" from Allied forces ...
 |
| Fontanelli and his men lose heart! |
This retreat was not lost on MacDonald who could clearly see the division from his headquarters.
 |
| MacDonald left with a retreating right and a smashed open left ... |
Worse still for MacDonald, the 4th Heavy Dragoons also rolled a "4", which also sent them off the battlefield in the direction of Sayda.
 |
| overall field at 13h00 |
This was still turn 3, so no new command dice! This meant that both Allied and French sides would have to rely on luck to get some more movement from their forces ...
 |
| center of the French left, two divisions were set to hold off the Prussian army corps! |
Over on the French left, only a conscript brigade held the remains of the fortified line, with Prussian Uhlans and Cuirassier breaking through and Prussian horse artillery massing before them!
 |
| only conscripts hold the line now |
 |
| view from the French left, with Olbernhau in the distance behind a long column of Prussians! |
Guylai held the Allied left before Ansprung and facing Zoblitz. He was to manage this holding action while destroying all of the Württemberg division.
 |
| Allied left looking towards Zoblitz |
 |
| Gyulai formed into two lines, with Grenzers in the front |
 |
| overall view of field from Allied left wing, Zoblitz to the top left of picture |
 |
| overall view of field, showing the Prussian column, the bridge to Sayda is in the top right |
Turn three with so few CD's, was to have three pulses.
 |
| view of the field at 13h45 |
IV Corps, under Bertrand decided to hold their position, now that the Italians had been sent to shore up the crumbling flank of XI Corps. The Dragoons were sent off and Arrighi was ordered to join the light cavalry with Bertrand, as this battle looked as though the Prussians could not be stopped.
The Austrians had a morale drop and the leading Grenzer formations retreated, in good order though damaged, they fell back behind the second line and began to recover from their wounds (this was the first time I could do this in an organized way during an active battle!).
 |
| Württemberg forces are gone, Austrians fall back into defensive posture |
Over on the French left, the Prussian column had mostly halted, due to poor dice rolls ... also the French conscripts managed to flee from the artillery - also unscathed!
 |
| the ominous looking Prussian column |
 |
| French defenses looked stiffer on the left now that the Italians had recovered |
Turn 4 was to be the deciding one. A new set of CD's were rolled ... this time the Allies again only had 2 CD's, the French had 5.
Pulse 1 went so fast that I took no pictures. The major events were: Prussians closed up on the French left, Austrians did recover some Grenzers, Russian cavalry and infantry arrived. For the French side, the Italians fled AGAIN!, this time taking Morand's division with them along with Bertrand doing a 'lapels' on Morand. It was over, IV Corps was suffering a loss of morale and XI Corps had no more reserves to reach for.
 |
| turn 4 pulse 2 17h00 all Allied forces had arrived on the table |
 |
| Morand is covering while Fontanelli flees |
|
 |
| Bertrand had no reserves and no command dice to help |
 |
| Austrians were content to watch the French and Italians melt away in confusion |
 |
| though hardly moving by the end, the Prussian corps was the winner in this contest |
 |
| the dead lying out before the Austrian positions were testament to the ferocity of the battle |
 |
| Crenneville managed to recover at least 1 casting to his Division while back in a recovery position |
 |
| Fontanelli's Italians did not perform at all this day ... |
 |
| The newly painted Prussians under von Kleist were the victors of the day |
 |
| a long view across the victors from Ansprung perspective |
The battle was clearly an Allied victory, with MacDonald forced back towards Sayda, IV Corps could continue in the Marienberg area, though how much confidence could they have in the Italians?
 |
| IV Corps and Light Cavalry ... still active in the region |
 |
| MacDonals and XI Corps will have to withdraw to Sayda ... the way is open |
Prussian cavalry would be forced out due to casualties (they were hot in the battle) the Cuirassier charged into the French in one last attempt to break their line, it cost each unit 5 hits (the Cuirassier were still alive due to their having 6 hit capacity ... though they could not recover any of this battle strength).
 |
| Prussian Cavalry will have to fall back and recover before taking any more action |
 |
| the Prussians under von Kleist, von Klux division will also have to fall back |
Austrians would have to do without their Grenzers for a day as they recover from eliminating the Württemberg force.
 |
| Austrians, will lose use of Grenzers, still active in the region |
Russian forces did not actively engage in this battle.
The campaign route to Sayda is now open, though IV Corps continues to be in Marienberg, and therefore blocking (or threatening) any sustained advance.


.jpg)


4 comments:
A great AAR. Waiting to see the next battle!
Rafa
That was a stirring action, David and quite the début for your Prussian corps. I had far more pessimistic expectations for the Allied side in this; I anticipated that the Russians would be needed to turn the tide and that the Prussians would be stuck slogging it out! Very good news for Schwartzenberg and the Monarch! They will surely give out medals and knighthoods tonight!
You did a nice rendition of the Zoblitz-Olbernhau map on your table. How did you support your draped hills?
That was a decisive battle David! After holding on during the initial skirmishes of the campaign it seems that MacDonald's position has been pierced and the Allies are now through the barrier of the Bohemian mountains?
Thanks Gents,
Jim, your question has led me to plan a blog post about how I do my table layouts.
There is a 'route' open, though it is not 'clear', as IV Corps is still technically in Marienberg so it could strike at any units moving and cuts off supply.
Post a Comment