For the Campaign of Nations play test, there remained one last potential field battle.
A rather complex one with two French forces converging on a Russo-Swedish Allied one.
 |
| Pozzo di Borgo and Voronsov commanding for the Russo-Swedish Allied forces |
I used
Fast Play Grand Armee (click on the link to go to the free rules online) to run the game, with a separate 'start time roll' for each of the Attacking French forces. This was done to simulate the difficulty in co-ordination of widely disbursed forces that have no direct line of communication between them. The rolls came up 5 for the north force, XIV and III Cav Corps under Corbineau and 6 for Oudinot's XII Corps.
This could make sense, as Corbineau would have to assemble the foot and would not have had a clear picture of the ground. Also Oudinot had just retreated away from a battle on the same ground, so there would be plenty of shadowing Cossacks in the woods to hamper his return approach to the battlefield.
It did mean that the Russians could concentrate on the north force, hamming them to see if they would break before Oudinot could arrive, also that there would be only limited time in the 'first day' of battle for the French to get their victory.
 |
| Deployment, north side of the Spree in the foreground right with III Cav Corps and XIV Corps |
St-Cyr was placed in battlefield command and chose to mass the artillery into a grand battery on his right. III Cav Corps was on the left, with a column of conscripts all set to run up the road in the center, backed up by Chasseurs from III Cav.
 |
| French deployment on the north bank of the Spree |
The Russians now also had two more foot batteries, having taken them from the Polish corps two days before. The massed these with their huge position batteries of 20-pounders to sweep the river crossing and beyond.
 |
| Russo-Swedish deployment on the South side of the Spree |
Right from the outset the French gained initiative, though the powerful massed artillery proved too much for the conscripts, an entire brigade simply vanished in a cloud of gunpowder from the first moments of the advance. The Russians kept up a steady flow of Hussars and Cossacks to keep throwing back any that attempted to cross the river.
 |
| Turn 5 pulse 2 or about 16h30 - French are still not across the Spree |
The French III Cav Corps, ran their horse artillery up to the river's edge and began pounding Russian horse on the opposite bank.
 |
| French Horse batteries pounding out shot at Russian Hussars |
Cossacks seemed to be everywhere at once, screening the massed artillery from counter-battery fire and striking at French brigades that were in the bridgehead ...
 |
| The chaotic scene at the bridgehead |
St-Cyr had sent off a division of light cavalry from III Cav Corps to flank the Russian position ... so far they had not emerged from the woods.
 |
| French QG of Marshal St-Cyr, behind him is Baron Corbineau |
Arrighi, commanding III Cav Corps was having some command challenges of his own.
 |
| French III Cavalry Corps Command |
The Dragoons under his command, had been set as reserve and they were ordered to move up - in preparation to exploit any opening at the bridgehead. Their commander, Defrance, chose to withdraw them back to beyond their starting position. Indeed, had the Russians and troops closer to the river then these Dragoons may have left the field entirely! One of the interesting aspects of
Fast Play Grand Armee is that a division may suddenly roll a 2-4 (on 2d6) and you will find yourself having to scramble to make up the situation, in this case it was not so bad.
 |
| French Dragoons nearly decided to withdraw entirely ... |
Turn 5 done, only 2 pulses - not so good for the Russians, as now Oudinot was to start arriving to the south and they were going to be facing a crossfire on a strategic level!
The Swedish cavalry began to flex their muscle now, charging immediately at the Frenchmen arriving with Oudinot, sending a contingent of Saxons scurrying for cover in the forest.
 |
| 17h00 Turn 6 pulse 1, now Oudinot was arriving. |
Defrance had been turned around and was now in column of brigades , making for the bridgehead.
 |
| French heavy cavalry move back into the bridgehead |
French artillery was still being confounded by marauding Cossacks, screening the flank of their heavy artillery from counter-battery fire.
 |
| French artillery firing on cossacks |
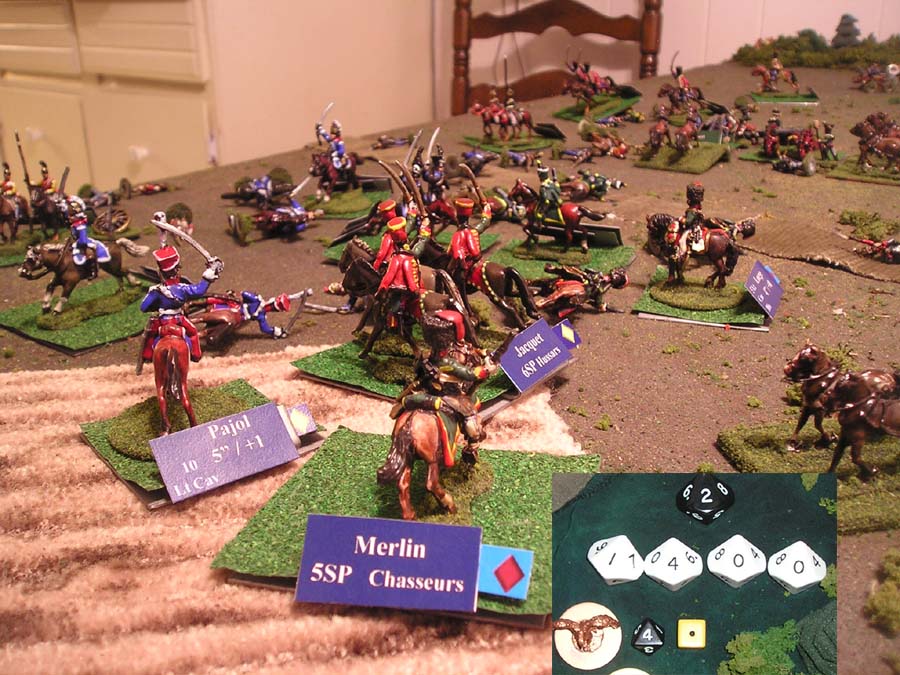
At the bridgehead itself, Pajol now had made a breakthrough, at last there were no more Cossacks to impede his breakout.
 |
| A breakthrough at the bridgehead by French Cavalry |
The way was certainly not clear for the French though as Russian Cavalry was still active ... and taking fire from French Horse batteries on the north bank.
 |
| French Horse guns continue fire |
Now though a critical event came ... the huge Position battery guns had to flee from a Conscript brigade!
 |
| Russian HQ watches as massed batteries are forced back by breakthrough infantry |
In this same hour the flanking division of light horse made their appearance, though the commander chose to hold, this now clearly put the Russio-Swedish force in a three-sided box!
 |
| French Light Cavalry Division appears from the woods |
The Swedish cavalry was now positioned to fall upon Oudinot's forces once they arrived ... this would not be an easy French victory!
 |
| Swedish cavalry massed for combat |
Then, anti-climax, the turn ended. This called for a potential for 'end of day' die roll. Both rolled a "5" on 2d6. This meant that the day of battle had ended. This could represent rain showers falling or other major clouds that darkened the field too much for the commanders to effectively continue. The Russio-Swedish army was still in-tact, though somewhat battered.
Corbineau chose to pull back from the tenuous bridgehead and re-place some of his losses and round up some of the stragglers into the wounded brigades.
Oudinot would be able to fully deploy and engage the Allied army directly.
Once again a die roll to start the day's action would be done, this time only one roll though. The roll was a "3", representing around noon. Again this could be due to rains, or diplomacy - asking to have the Russians and or Swedes surrender; or it could have been continued Cossack harassment of Oudinot's Corps arriving though the night and morning; or indeed some combination of these and other factors.
Pozzo di Borgo, would have one more day to fight, this time Oudinot would be at point blank range. The target was obvious - Oudinot's command headquarters.
 |
| Opening situation on DAY 2, turn 3 or about 12h00 |
On the north bank two divisions of light cavalry was ready to cross and press home on Russian artillery and cavalry.
 |
| French light cavalry would cross again on day 2 of the battle |
The Russian lines were thinner than before, though still completely in tact for brigades, many were under strength from the exertions the day before. Certainly there were fewer Cossacks to screen off the French guns.
 |
| Russio-Swedish Allied army - the 'meat' in the sandwich ... |
Now there would be another Corps of French and German allied troops to hold off ... Oudinot was on the field in force.
 |
| Oudinot's XII Corps fully deployed for battle ... |
The Russians knew that all would depend on who got to move first, so they threw in all that they could to take the initiative on this first pulse of turn 3 in day 2 - they won it 10 to 7!
 |
| Field of chaos, as XII Corps collapses |
No time at all was wasted, the Swedish cavalry was cut loose totally, Saxons and other German allied troops were utterly destroyed in the charge of the Lifeguard Dragoons. Lifeguard Cuirassier smashed though the center batteries of XII Corps and then on into the command headquarters of Oudinot himself. He failed the survival roll - the headquarters was sent fleeing in all directions and Oudinot himself was dead! Raglowich, commanding 29th Division was also cut down, this time by Swedish Hussars. Only the cool reaction of Guilleminot and the 14th Division even kept what was left of XII Corps in the field.
 |
| Smashed remains of XII Corps as A Marshal and GdD are killed! |
 |
| The bridgehead is successfully taken and now exploited |
The bridgehead was stormed and exploited very well on the north bank, however the grand battery - seeing that Oudinot's force was to be cut to pieces, chose to withdraw from the riverbank? (damn those "3"s!!!)
 |
| Arrighi and III Cav Corps were across the river in force now ... nothing could hold them back |
Over on the flank facing the woods, the best escape route for the Russian horse, there was a different tale. General Fournier and his 6 light cavalry Division were cut apart by Cossacks and Russian Hussars and lancers. Only a remnant of one brigade remained in the area. If only the Russians could keep alive, then maybe Corbineau's force could be driven off also?
 |
| Russian cavalry smash though to the woods line |
It was not to be, turn 3 ended there and the new turn initiative was won by the French.
 |
| DAY 2 Turn 4 14h00 |
Corbineau wasted no more time with the delaying tactics of the Russians, this time the Russian Grenadiers were to be surrounded and crushed. Over on the far flank, Swedish cavalry was forced to recover into new defensive positions, and the Russian horse were too far away to make any effectual difference in the outcome.
 |
| Breakout, now the bridgehead was open, the left flank was going to do envelopment |
|
|
|
|
|
|
|
Even with the artillery falling back, Corbineau still had a full Division in reserve, there were to be no mistakes on the field today.
 |
| French strategic reserve |
French lancers and hussars broke out on the left flank and effected link up with the retreating elements of XII Corps.
 |
| flank envelopment was completed |
The second half of the pulse was to be the end for the Russio-Swedish force.
 |
| taking too many losses, the Russio-Swedish for of Pozzo di Borgo's morale collapsed |
The final acts were to be a series of French cavalry charges, that cut apart weak Russian or Swedish units.
 |
| French Cavalry charges |
 |
| Swedish Lifeguard Dragoons fight off two brigades of lancers and hussars |
 |
| Russian Dragoons rapidly re-deploying from the lift to right flank ... it was not to be fast enough. |
French infantry divisions were now swarming over the abandoned earthworks of the position batteries, while French Cavalry was triumphant on the open plains. The Russo-Swedish force would have to flee, abandoning the artillery, into the woods.
 |
| French infantry were across the Spree in force |
 |
| Corbineau had won the day |
 |
| French heavy cavalry was set to exploit the situation |
Oudinot was dead, Baron Corbineau would most likely take up the remains of his command ... though a huge action force of the two infantry and one cavalry Corps were now amalgamated in this area of the Spree River.
AND
The strategic goal of having three crossings of the Spree River was now complete, nothing could stop an army from the south crossing the Upper Spree in force, the path to Berlin was now open. Could a Marshal's Baton be in the offering for Corbineau?
 |
| Most of these forces are horse, they could easily escape via the woods - most certainly the Cossacks would not have surrendered |
 |
| Arrighi's III Cav Corps was bloodied but in-tact |
 |
| XIV Corps was wounded yet able to continue |
Much of XII Corps was in disarray and scattered in the woods to the south of the battlefield. It would be at least a day before any count could be made.


