For the planned campaign of 1813 we have set up a playtest, that included at least one tabletop action.
 |
| this image of the mixed brigade of Prussians in dim light was taken from the recent tabletop battle |
I was able to set up my table for this first action, a battle of a bridgehead near Potsdam.
I drew from the ONC map that I have for that part of north central Europe. It depicts a pair of lakes in somewhat swampy marshy ground, most of the region is inside the same topographic line, so no major hills are defined.
 |
| Tabletop field looking to the southwest, Potsdam (north) is to the right |
While Potsdam itself is fortified, the older Spree river has moved over the flat ground away from the 100 year old fortifications that are aimed more to the west.
Prussian 3rd Corps was centered in the fortifications, with 4th Corps and the Corps of the Oder not far away.
 |
| Prussian 3rd Corps deployed out looking east, the Cavalry Division is to the northwest - behind point of view |
Into this ground French VIIth Corps, under Reynier, have been given the task of making a bridgehead, then ordered to inflict what casualties they can and fall back across the Spree, while taking as few casualties as possible. Chosen to lead VII Corps across the river were the Saxon Divisions of Lecoq and von Sahr.
 |
| The Saxon Divisions of French VII Corps with attached artillery |
Far to the east at the second crossing of the Spree were the Polish Lancers of the 19th Light Cavalry Brigade of Tolinski with accompanying horse artillery.
 |
| Right near Potsdam town were the Polish Lancers under Tolinski |
The Prussians were in no subtle mood. Orders were for 3rd Corps to engage the French and hold them until 4th Corps could arrive and hammer the French to the river, with the hopes of drowning them in the Spree after taking back both crossings.
 |
| Prussians advance (my new cornfields get a first outing on the tabletop) |
The Prussians won the first initiative and had some troubles with Division commanders right from the start.
Krafft was tasked with taking the west side of the crossroads and the town, he simply did not move (rolled a 5). Standing right next to Bulow, amazingly, von Borsetll simply refused to move - indeed he mused about starting a withdrawal! Bulow, in no mood for pleasantries, grabbed Borsell's lapels and ordered him to attack at once! (Borstell rolled a 3 and the lapel grab by Bulow came up a 12!) For the Rest of the Prussian line it was simply an advance, as the guns were all out of range at the start.
 |
| View of the action from Reynier's headquarters at the Spree River |
The French had their own command headaches. The far-flung Polish Lancers took up many command dice to get them moving - the orders were to cross the river, by-pass the town and blunt the advance of the 4th Corps of Prussians for as long as possible! One brigade of cavalry versus a Corps of horse, foot and guns - the French were getting desperate!
 |
| In a high-risk maneuver, one Brigade of Polish Lancers will attempt to halt two Prussian Corps! |
The end of the first pulse of Turn 3, nothing incredible had happened, other than the sudden end of turn 3! In a one-in-four chance the turn came to an abrupt end.
 |
| while divided by rivers the table was to see movement or battle action all over its surface |
Jumping to turn 4 (about 2 pm - it is described as 'early afternoon') then the Prussians again won the first initiative and simply continued to advance and establish an artillery firing line, though the guns were left 'hanging' in mid air due to the continued contrariness of von Borstell! After following the attack order, he then promptly withdrew back to his starting position. While Krafft maneuvered at last into the town.
 |
| Prussians move to get guns into range |
 |
| Borstell counter-marches and withdraws back to his starting position ... Bulow must have been furious! |
 |
| von Oppen moved his Cavalry Division to the far right flank through open orchards (not a terrain challenge) |
Saxon General von Sahr's blood must have been up, for he chose this moment to fling his entire Division into an immediate close order assault against von Thumen's Line and Reserve brigades. This while Saxon General Lecoq finally shook off his lethargy and put his brigades into line and moved his artillery into supporting position.
 |
| First Saxon attack is driven back by Prussian fire |
The Prussians drove back von Sahr's attack, though the reservists did come away as badly damaged as the Saxons were, the line Brigade with its mix of cavalry (MX formation in
FPGA)
 |
| von Sahr survives the retreat of both of his brigades to continue leading them, now wounded |
Meanwhile the Polish Lancers folly of attempting to halt 4th Corps comes to an abrupt end. The leading formation of Landwher Cavalry wins the engagement and sends the lancers fleeing back towards the bridge.
Now the job of halting anything will have to come from the horse batteries.
 |
| Polish Lancers fall back after taking casualties |
Turn 4 was to see three 'pulses' (turn segments in
FPGA) and the troops ended thus:
 |
| overall situation at end of Turn 4 |
For the main Prussian line 3rd Corps had now set up and was delivering fire into the Saxons. von Borsetll had even managed to bring up his Division into a refused left position (still leaving the left of the guns open)
 |
| Prussian Gun line established and firing |
The Saxons of von Sahr were still pressing hard on von Thumen, and now had managed a flanking maneuver taking out the reserve brigade.
 |
| Saxons fighting hard to destroy Prussian formations |
The far east section saw the leading Landwher Cavalry under von Dobschutz drive the Polish Lancers back again, this time crossing over the Spree as well and threatening the horse batteries, the whole flank looked like it might just break under the determined assault of this Landwher Cavalry Brigade!
 |
| Field situation, the Prussians on the verge of victory? |
For the French, Durutte's 32nd Division of French Line troops and a brigade of Conscripts was getting into position - indeed this line could not have formed if von Sahr had not attacked the way he did. It looked like the bridgehead could be held, at least overnight?
 |
| Durutte's Division of French now backstopping von Sahr's Saxons |
While Lecoq's force did not face anything other than long range artillery fire ... Prussian General von Borstell continued to remain out of even skirmishing range.
 |
| Saxons under Lecoq hold the right flank |
The Polish Lancers could see that there was a full Corps of horse, foot and guns making its way westward, there was little they could do with the Prussians now across the river ... unless they could somehow lure the Landwher Cavalry far enough away from its commander ...
 |
| Polish Lancers seeking a way to outmaneuver the Landwher Cavalry |
On the other flank, the Prussian Cavalry of 3 Corps was ready for a moment of greatness ... the Saxon brigade was isolated after breaking a Prussian Landwher brigade. All three brigades of horse were in range to totally surround the Saxon foot-soldiers.
 |
| Prussian horse ready to strike (the new cornfields in feature foreground with the old sky-cloth in backdrop) |
Durutte also now had artillery batteries massing in all the gaps in his Division line, there would be no way to approach his position without risking the fire of batteries....
 |
| The field from Druutte's position, gun batteries festooning his lines |
 |
| Borstell's 'refused left' position |
Turn Five brought a huge reversal for the Prussians ... now the cavalry and Hessen-Homburg started to loose heart, falter and withdrew from their advanced positions, all without taking the opportunity to utterly destroy von Sahr's 25th Division!
 |
| the field at turn 5 |
The Polish Lancers trick worked, pulled out from support they charged at the Landwher Cavalry and sent them fleeing across the river. Now though there would be little chance to use the Horse Guns on any Prussian targets as they had to fall back so far away from the river line as to be out of effective range!
All this while 4 Corps continues to pour past them, now with English rocket battery and more foot artillery closing in on Lecoq's flank.
 |
| More Allied artillery coming with Prussian 4th Corps |
 |
| Polish Lancers had counter-attacked and were safe on their side of the Spree, though now the artillery was out of range to be of any effect on the moving Prussian columns of 4th Corps |
Von Borstell finally moved up to the line, while Krafft had lost his nerve again and withdrawn from the town, almost back to his starting point. The leading elements of 4th Corps were soon to be in striking distance of Lecoq's Saxons.
 |
| Prussian lines in a ragged condition as the forward formations have withdrawn - 4th Corps Landwher Cav seen on the right, with Saxon (French) brigade on the left |
 |
| The French 'line', much would now depend on Lecoq and his Saxon command ... could it hold back the 4th Corps? |
 |
| Prussian 4th Corps, passing Potsdam town with the first of the Corps of the Oder (cav) in behind |
Tipping point was close at hand, von Sahr had managed to pull back and had kept one brigade alive (the other went from artillery fire), the score was 2-2 (with the French needing 9 and the Prussians needing 5).
During the pulse, the Saxon commands of Krafft and Borstell would find their courage and close in with the French (Saxons). The cavalry rallied and turned about again and General Ludwig von Hessen-Homburg recovered the remains of his 3rd Division and drove them towards a final showdown with von Sahr.
 |
| field view turn 5 pulse 2 |
 |
| Krafft back in town and Borsetll at last moving into skirmish range |
 |
| Prussian 4th Corps and attached British artillery moving to striking distance of Lecoq |
 |
| Hessen-Homburg presses his ragged line forward (in the new cornfield!) |
French re-enforcement continued with a foot battery, now positioning on the right flank of Lecoq, to oppose the advance of 4th Corps.
 |
| Saxon heavy artillery bolsters the line facing 4th Corps |
 |
| von Sahr conducted a model withdrawal into the gap in the French-Saxon line |
French orders were to hold this line now till dark. Reynier was now informed that Count Hogendorp would not support any further day's battle on the north side of the Spree here. Now all Reynier had to do was to keep his brigades from taking any more losses and the damage to the Prussians would be greater than he had suffered.
Turn 6 pulse 1 was to be a watershed moment for the Saxons. As two divisions, the first two that were in the field on this day, were utterly destroyed.
 |
| field view at 18h10 |
As the sky grew dark, the Prussian cannon dealt out hits to the Saxon guard brigade. The Saxons had been pulled out during an engagement with Prussian Landwher, now they were closer to the guns and well within range to be flanked by Borstell and Krafft. Which these commanders managed to do. The Saxon Guard was destroyed to the last 500 men falling back in confusion ending up right in front of the English Rocket Artillery....
 |
| Lecoq's Division is cut apart by Prussian artillery and bayonets |
 |
| Arriving as too little too late the Saxon Hussars seek to change the outcome as the sky grew dark |
 |
| With the sun setting Durutte could suddenly see that the Saxons would not hold - Prussian horse, foot and guns were going to be in range of the only route to escape soon ... was that dark rainclouds? Could this be how the French would escape? |
 |
| 4 Corps as seen from the Polish Lancers |
 |
| Prussian Landwher block the bridge before the Polish Lancers, with the Corps of the Oder marching in behind |
Turn 6 pulse 2 - approximately 18h50 saw the end to this contest. The Saxon Guard was killed almost to a man as the English Rocket Artillery scored a hit on the men who had fallen back from the Borstell and Kraft death trap. This was rapidly followed by a charge from 4th Corps Landwher Cavalry that destroyed the Saxon foot battery which did not escape.
 |
| the field at Turn 6 pulse 2 |
With Prussian Cavalry now in striking distance of the only remaining bridge over the Spree, Reynier was faced with the possibility of loosing his entire command.
 |
| Prussians had broken the French line |
 |
| Krafft and Borsetll deliver the killer blows |
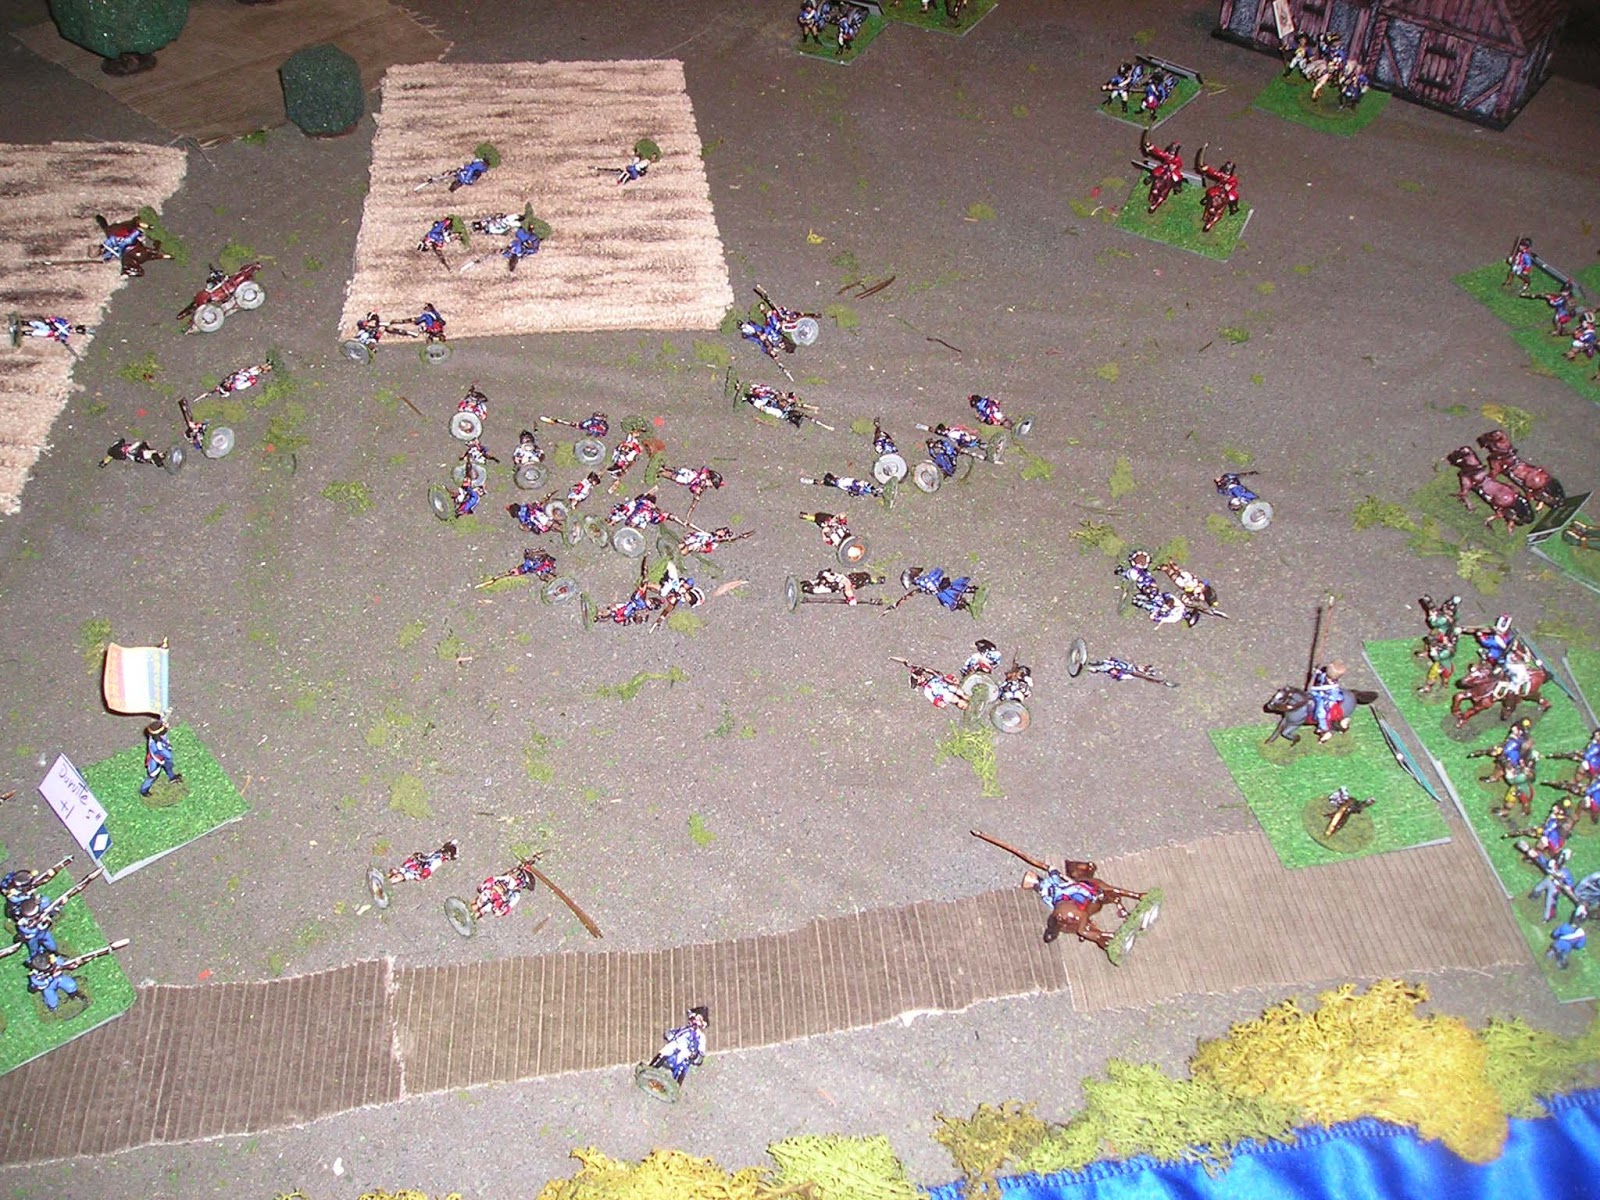
 |
| The TOLL, each casting represents approximately 500 men |
With the sun set and light fading fast in a downpour (the two sides rolled 2d6 and each came up less than 6 = end of day's battle) - meaning that the Prussians could not complete their victory, the French Division of Durutte was able to get back across the Spree.
 |
| Prussian 3rd Corps, some units still not at full strength, two Divisions are gone |
 |
| Prussian 4th Corps, Landwher Cavalry still wounded |
 |
| Prussian Corps of the Oder - still in fighting form |
 |
| French VIIth Corps, not much more than a Division in strength ... |


.JPG)


